
When I visited Tromso in Norway, I had my Samsung phone and an older dslr camera I had borrowed from a friend, and I had no clue on how to use them to shoot the Northern lights. And I want to show you how to photograph northern lights on Samsung phone that I had learnt.
A lot of people assume you need a big fancy camera to photograph the Northern lights, and yes, you will get fantastic images but phones are getting so good now that you can take pictures with your phone with great results.
If you’re heading to Norway with a Samsung or an android phone, don’t feel like you’re missing out because everyone online is carrying a huge camera and a tripod that costs more than the trip.
I’ll walk you through tips and settings from what I know on how to photograph northern lights on Samsung and android phones.
Table of Contents
Here are my top picks Hotels in Tromso Norway that I have researched on:
⭐️⭐️⭐️ Smart Hotel Tromso Located in Tromso city centre, vibrant, cafes and restaurants nearby, spa facilities and near to the main attractions.
⭐️⭐️⭐️⭐️ Radisson Blu Hotel Tromso Also located in the city centre, gym, spa facilities, pool, sauna
⭐️⭐️⭐️⭐️Aurora Borealis Observatory Located outside in the suburbs of Tromso, with breakfast included and Wifi, airport shuttle, they have facilities for you to enjoy the Northern Lights
Which Samsung Phones are best for Northern Lights Photography?
Newer Galaxy S phones generally have the most capable camera systems for this type of photography.
That doesn’t mean an older Samsung can’t do it.
If your phone has Pro mode, you can experiment with manual ISO, shutter speed and focus.
The exact camera modes available depend on your model and software, so check your phone before your trip rather than assuming every Galaxy has exactly the same options.
Travelling to Tromso Norway in Winter, I have a Tromsø Travel Guide: Northern Lights, Where to Stay & Everything You Need to Know to help you plan your trip
Samsung Settings for the Northern Lights, Pro Mode
1. Mount the phone on a tripod.
- If you don’t have a tripod, make sure to rest your phone on something completely still, this is a very important thing to do.
- And if you are holding your phone instead, make sure you are able to hold your phone super still for least 10 to 15 seconds.
2. Open you Samsung Galaxy Camera app, swipe across to More, and tap Pro (picture).
- Pro mode gives you manual control of ISO, shutter speed and focus. Night mode alone tends to brighten shadows too aggressively and can leave the sky looking flat.
3. Adjust the ISO between 400 to 800 to start, and you can go up to 1600 for a very faint aurora, since more ISO also means more grain.
4. Click the 4 dots on the right hand corner, click on the clock icon, and set shutter speed somewhere between 5 and 10 seconds depending on brightness (brightness meaning how light or dark the area you are in is, if it’s very dark then can be lower, if it’s quite bright like in a town centre and push it higher).
Tromso in Norway, is by far the best Northern lights experience I had, very strong and out of the days we were there, we saw it everyday.
If you are planning on going to Tromso, Norway, these are few tours I can recommend:
Tromsø: Northern Lights Chase in a Small Group with Photos
Tromsø: Reindeer Sledding, Feeding & Sami Culture Experience
What is ISO?
ISO controls how sensitive your camera is to light.
For a dark sky, increasing ISO helps your phone capture a brighter image.
But there’s a catch.
Higher ISO also tends to introduce more noise, which can make the sky look grainy.
That’s why I’d start around ISO 800–1600 rather than immediately pushing it as high as possible.
If the photo is too dark, increase it gradually.
If the photo looks noisy, try lowering it.
What Shutter Speed Should You Use to capture the Northern lights?
Shutter speed controls how long the camera captures light.
A longer shutter speed lets in more light, and this is needed when the aurora is faint or the area is not as dark.
This usually means you have to keep your phone very still for longer 10 seconds longer, it may not look like it is doing much but wait till the camera says it’s done, otherwise the picture gets blurry.
Also keep in mind that if you use a very long exposure while the aurora is moving quickly, its shape can become blurred.
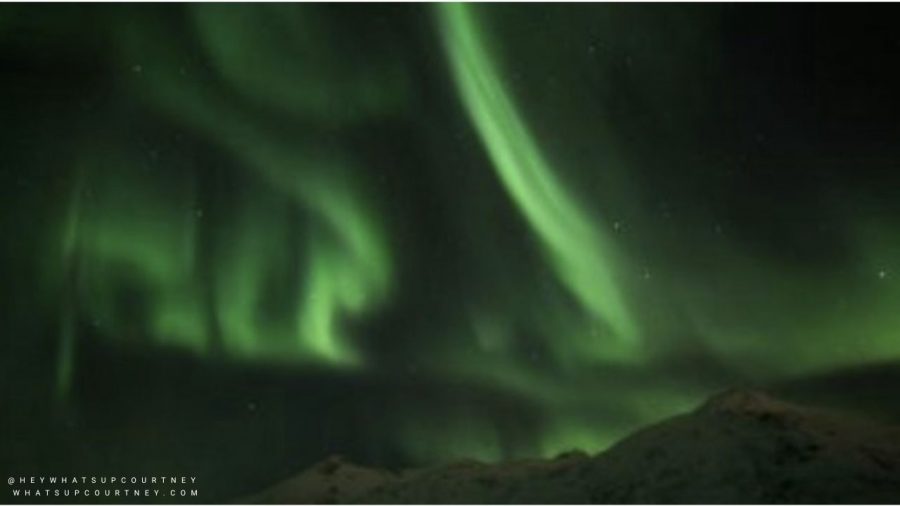
Using Expert RAW for Northern Lights Photos on Samsung
Expert RAW is a separate, free download available through the Galaxy Store, not the regular Play Store, on newer Galaxy S phones.
It uses multi frame capture to reduce noise and pull in more detail than Pro mode alone, and it saves RAW file, useful for anyone planning to edit in Lightroom afterward.
Inside the app, the settings work the same way as Pro mode, ISO, shutter speed and manual focus, just with a stronger result.
Here’s the best things to do in Tromso Norway you can do while visiting here other than Northern Lights.
How to use Night Mode for Northern Lights on a Samsung
If you want a simpler method, the night mode is quite good. I used it in Newcastle Upon Tyne City centre one night when the Aurora was very strong.
I couldn’t see the lights with my naked eye except some movements like a cloud moving pass at night, but I took a chance on night mode on my S24 plus and it worked.
Samsung’s Night mode caps the exposure automatically on most models, often around 10 seconds, and it’s built for brightening a dim room rather than capturing colour accurately in the sky.
Night mode settings for Samsung
1. Again we mount the phone on a tripod.
2. Open you Samsung Galaxy Camera app, swipe across to Night Mode
3. Keep it at 1x zoom, you can try with wide but 1x zoom for me, gives better results.
4. Click the 4 dots on the right hand corner, next to the 1x, 2x etc.
5. Click on the clock icon, and set shutter speed to10 seconds and hold still if you are holding your phone or again a tripod. You have to allow the camera to slowly to get as much colour and light in.
What about other Android Phones?
Samsung is what I actually shoot on and other Android brands have their own version of manual control, usually called Pro mode or Manual mode, sometimes they are located in a similar spot in the camera app, and the same core settings apply, low ISO to start, a slow shutter speed, manual focus set to infinity.
Google Pixel phones go a step further with a dedicated Astrophotography mode built into Night Sight, which handles long exposures automatically and is a good option for anyone shooting on that phone.
Common Mistakes on how to photograph Northern Lights on Samsung
1. I know alot of people would say using Night mode instead of Pro mode. However, I find on a strong night for the northern lights, it is not bad, and it worked when I did it with some city lights about. Especially if you are a beginner.
2. Switching to the ultrawide lens is another, it lets in less light than the main lens and the results turn soft.
3. Tapping the shutter by hand instead of using the timer introduces just enough shake to blur a long exposure.
4. And most important, do no leave your phone out in the cold for too long as it drains the battery fast. Try to keep it in an inside pocket between shots and wipe the lens often as it can fog up quickly in cold air.
FAQs About Photographing the Northern Lights on Samsung and Android phones
Which Samsung phones can photograph the northern lights well?
Recent Galaxy S and Note series phones handle it best, with larger sensors and Expert RAW support. A series phones can still manage it in Pro mode, just with more noise in low light.
What ISO should I use for northern lights on Samsung?
Start around 800 and go higher only for a very faint aurora, but you may get more grain the higher you go.
Can you film video of the northern lights on Samsung?
Yes, though it needs a bright, active aurora. Hyperlapse mode switched to Night Lapse handles a long exposure timelapse automatically and looks best when the aurora is moving fast.
Do I need Expert RAW or is Pro mode enough?
Pro mode alone produces good results. Expert RAW adds noise reduction and more detail through multi frame capture, a solid upgrade when it’s available on your model.
Why are my northern lights photo on Samsung phone blurry?
Wipe your lens first and it’s a possibility there’s a Camera shake during the exposure, happens to me all the time when I tried taking a photo using my hands only.
Try to use a tripod and the 5 second timer instead of tapping the shutter directly or place your phone on something (ensure your phone is balanced properly and not wobbly), and then take the shot.
Have the best time and hope you get to see the Aurora borealis with your naked eye first and enjoy the moment.
Courtney xx
Planning a trip to Tromsø Norway? I’ve got a few more guides to help you plan the rest of your Arctic adventure:
- 13 Best Things You Must Do In Tromsø the places and experiences I’d put at the top of your list.
- Entering the Arctic Circle in Tromso Norway (My personal experience) what it was actually like to cross into the Arctic Circle.
- Review of the Sydspissen Hotell in Tromso Norway my honest take on staying at this Tromsø hotel.
- Tromsø Travel Guide: Northern Lights, Where to Stay & Everything You Need to Know for 2026
WhatsupCourtney
Hey! I’m Courtney, creator behind the travel and food site WhatsupCourtney and @heywhatsupcourtney on socials.
If you want trips that feels good while you’re there without the stress and to find a way to go on trips more often, you’re in the right place.You will find detailed travel itineraries to destination guides and food worth seeking out, everything here is built to help you spend less time planning and more time experiencing the places you visit.

Leave a Reply